Thursday, February 16, 2006
Part VI - Storing Sunday Comic Strips
Yesterday we did the classroom work on storing Sundays, today we go into the lab and get to the practical side.
Let's start with bagging. I'll be honest and admit that I bag very few of my Sunday comics. I should but I don't. Two reasons; first of all, the bags are very large so they get a bit pricey, especially at the rate I'd be using them. Even cheap polypropylene at the size needed (20" x 30" for full sheets) costs 15 to 25 cents per bag. There's a lot of Sundays that really aren't worth all that much more than the price of the bag. Second, I find that the large bags needed to store full newspaper pages are unwieldy and it is easy to damage the strips when trying to wrestle them into these monsters if you don't take great care.


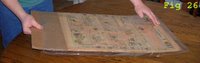
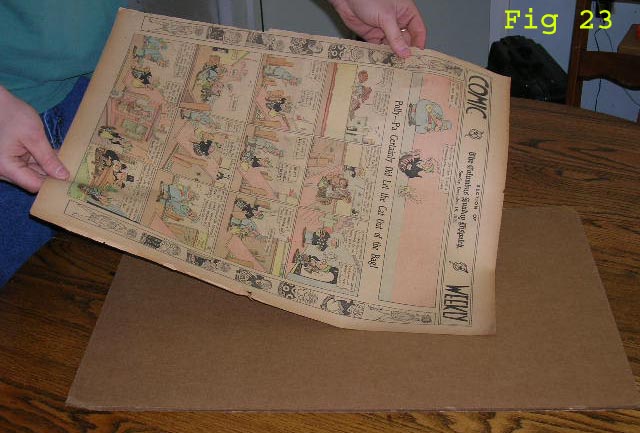
 I do have a trick that makes inserting Sundays into a bag a less risky and acrobatic proposition. All you need is a cardboard backer a little smaller than the size of the bag. Lay your Sunday section or page on the board (figure 23). Then lay the board on a flat surface, and get one end started into the bag (figure 24). Then lift the combination and slide the bag up along the board (figure 25). Now just pull the board back out of the bag, leaving the Sunday inside (figure 26, 27). To make this even easier, use 4 mil bags - they don't cost much more, but they're much stiffer so they're easier to load and they provide good support to the contents.

This trick brings up the question of backer boards for Sundays like we use for dailies. They are available from Bags Unlimited (the size we'd want are marketed as "Rock & Personality Poster" backers - 20" x 28"), but they are quite expensive at about $2 apiece. I reserve these for very fragile and valuable items. Remember, if you're going to use backer boards, make sure to get acid-free.
The real challenge to storing Sundays, though, is not so much the bagging of individual pages or sections, but storing your collection so that you can access the material easily. As have many collectors when they started out, I used to store my Sundays in any old cardboard box I could find that had large enough dimensions so that the sheets could lay flat in the bottom. Trouble is, the boxes you find that can handle a Sunday laying flat in the bottom are usually huge boxes, the sort of thing that a refrigerator comes in.
Tall boxes really don't work well because as your collection grows, not only do the boxes get very heavy, but finding a particular Sunday in such a large pile of material gets to be a major chore. What I wanted were short boxes big enough to handle even the biggest jumbo Sunday page (up to 20" x 30"), preferably with a lid that can be removed (rather than having to deal with flaps). Many moons ago I found the perfect thing. Kodak used to make a lovely thin box of the proper dimensions. They were for storing large scale negatives; the ones used in some printing processes. Unfortunately, even 20 years ago Kodak no longer made the product or the box, so I was stuck with only a few of these perfect storage boxes.
I spent several years looking for alternatives and found nothing. I finally resigned myself to the idea that the boxes would have to be custom made. However, being the cheapskate that I am, I wasn't about to go pay someone to build custom boxes, especially in the quantity I need. Enter my Dad, about as handy a guy as you're ever likely to meet. I challenged him to come up with something that fit my requirements. He did, and now he'll walk you through the steps of building the perfect Sunday comic storage box. I photographed him making one of his masterpieces.
The raw material for the boxes are large pieces of flat corrugated cardboard stock. You'll need pieces that are a minimum of 24" x 32". It takes two pieces of that size to make one box (base and lid). You can get cardboard flats through most shipping supply companies, including Uline. However, the shipping on large pieces of cardboard can get pretty expensive, so if you can find a local supplier you'll probably save quite a bit. Check the Yellow Pages under Cardboard, Boxes, or Shipping Supplies.


The tools you'll need to build your own storage boxes are shown in figures 28 and 29. You'll need a box-cutter, a square or some other straightedge, a tape measure, a medium size Phillips screwdriver, packing tape, glue, a pencil and a set of four (or better yet, eight) clamps. You can substitute clothespins or the like for the clamps in a pinch (ha!).
 First you'll need to cut the cardboard to size. Cut one piece to 31" x 24 1/4"and the other to 30 1/2" x 23 3/4". The first one will become the lid, the second the base. Mark the cardboard using your tape measure, then place your square and cut along it (figure 30). If you're the forgetful type, like me, mark the pieces to indicate which is the base and the lid. You'll need to keep that straight while building the box.
Now that you've got the cardboard cut to the correct dimensions, you're going to form the vertical sides of the box.
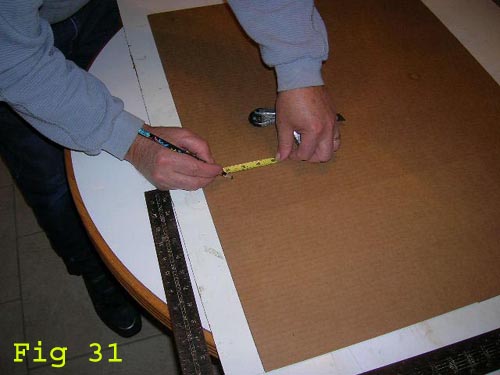
 On the piece that is to become the lid, make marks 1 1/2" in from the edge along all four edges. On the base, do the same, but make your marks 2" in from the edges (figure 31).


Now put your square or straightedge along each of these lines you made and run the Phillips screwdriver along the lines (figure 32). You'll want to press firmly when doing this. You are trying to put a deep score in the cardboard. The Phillips screwdriver will make a rather wide and messy looking score line, but we found that this method works best - a thin score doesn't fold up nearly as well. Figure 33 shows what the scores should look like.


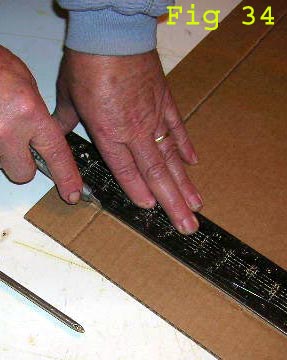
Once you've got all eight scores completed (four on each piece, that is), the next step is to use your box-cutter to cut tabs at each of the corners. Figure 34 shows the cutting of a tab. Make only one cut at each corner. You don't want to cut off those little squares, just free one side of them. Figure 35 shows what you're trying to do. Now this is really important. Cut the scores in one direction on the base, the other direction on the lid. In other words, if you cut along the long edge on the base, cut along the short edge on the lid. If you make the same cuts on both pieces the lid won't fit well on the box.

Once your cuts are made, fold the tabs up as shown in figure 35. Then fold up the entire length of the scores along all the score lines as shown in figure 36. Work the fold back and forth a bit so that it's relatively happy about staying in a vertical position. If you don't make these creases so that they stay vertical, the final result will not fit together very well.


Now take your glue and put a daub on the outside edge of each of the tabs (figure 37). Don't slather on a whole bunch of glue - it's not necessary and will just take longer to dry. After gluing each tab, stick the glued side to the adjacent vertical. Get it nice and square and clamp the two pieces together, as shown in figure 38. You may end up with a little bit of the tab sticking up past the edge of the adjacent vertical. No problem - you can trim that off with the box-cutter after the joint is dry. Figure 39 shows our piece all clamped up. Set each piece aside and wait for the glue to dry - about 10-15 minutes.

Once the glue is dry take the clamps off. For a little extra strength in the corners, tape each edge on the outside (figure 40). Use wide packing tape so that you can fold some of it inside the box. Not only does this strengthen the box, the smooth surface also makes the lid mate more smoothly with the base.
If you don't plan to bag your Sundays be sure to lay a bag in the bottom of the box. We don't want newspaper touching the cardboard. Figures 41 and 42 show the completed box, ready to start storing your collection.


Reading through these instructions you may think building a box is a pretty big job, but it's a lot easier in practice than it is to explain. The whole process of building a box takes no more than a half-hour or so once you've done a few. My dad was able to build the one you see in the photos in about 45 minutes, and that was with me stopping him constantly to take pictures and write down the steps. And of course the process becomes a lot more streamlined if you build a whole batch of boxes all at the same time, which is the way he normally does it.
Tomorrow we'll finish off this series with a quick tour of my storage area plus a few words about how I keep track of the items in my collection. If you have any suggestions or concerns that you think should be incorporated into this series, now would be a great time to let me know. Also, I'd love to hear about and pass along any hints, tips and techniques you use for storing your collection. Unlike most collecting categories, there are no real tried-and-true, set in stone methods for storing a comic strip tearsheet collection. I'm sure a lot of you have developed your own techniques for dealing with the problems of storing tearsheets.
Tomorrow: Part VII - Storing and Tracking a Large Collection
Let's start with bagging. I'll be honest and admit that I bag very few of my Sunday comics. I should but I don't. Two reasons; first of all, the bags are very large so they get a bit pricey, especially at the rate I'd be using them. Even cheap polypropylene at the size needed (20" x 30" for full sheets) costs 15 to 25 cents per bag. There's a lot of Sundays that really aren't worth all that much more than the price of the bag. Second, I find that the large bags needed to store full newspaper pages are unwieldy and it is easy to damage the strips when trying to wrestle them into these monsters if you don't take great care.

 I do have a trick that makes inserting Sundays into a bag a less risky and acrobatic proposition. All you need is a cardboard backer a little smaller than the size of the bag. Lay your Sunday section or page on the board (figure 23). Then lay the board on a flat surface, and get one end started into the bag (figure 24). Then lift the combination and slide the bag up along the board (figure 25). Now just pull the board back out of the bag, leaving the Sunday inside (figure 26, 27). To make this even easier, use 4 mil bags - they don't cost much more, but they're much stiffer so they're easier to load and they provide good support to the contents.

This trick brings up the question of backer boards for Sundays like we use for dailies. They are available from Bags Unlimited (the size we'd want are marketed as "Rock & Personality Poster" backers - 20" x 28"), but they are quite expensive at about $2 apiece. I reserve these for very fragile and valuable items. Remember, if you're going to use backer boards, make sure to get acid-free.
The real challenge to storing Sundays, though, is not so much the bagging of individual pages or sections, but storing your collection so that you can access the material easily. As have many collectors when they started out, I used to store my Sundays in any old cardboard box I could find that had large enough dimensions so that the sheets could lay flat in the bottom. Trouble is, the boxes you find that can handle a Sunday laying flat in the bottom are usually huge boxes, the sort of thing that a refrigerator comes in.
Tall boxes really don't work well because as your collection grows, not only do the boxes get very heavy, but finding a particular Sunday in such a large pile of material gets to be a major chore. What I wanted were short boxes big enough to handle even the biggest jumbo Sunday page (up to 20" x 30"), preferably with a lid that can be removed (rather than having to deal with flaps). Many moons ago I found the perfect thing. Kodak used to make a lovely thin box of the proper dimensions. They were for storing large scale negatives; the ones used in some printing processes. Unfortunately, even 20 years ago Kodak no longer made the product or the box, so I was stuck with only a few of these perfect storage boxes.
I spent several years looking for alternatives and found nothing. I finally resigned myself to the idea that the boxes would have to be custom made. However, being the cheapskate that I am, I wasn't about to go pay someone to build custom boxes, especially in the quantity I need. Enter my Dad, about as handy a guy as you're ever likely to meet. I challenged him to come up with something that fit my requirements. He did, and now he'll walk you through the steps of building the perfect Sunday comic storage box. I photographed him making one of his masterpieces.
The raw material for the boxes are large pieces of flat corrugated cardboard stock. You'll need pieces that are a minimum of 24" x 32". It takes two pieces of that size to make one box (base and lid). You can get cardboard flats through most shipping supply companies, including Uline. However, the shipping on large pieces of cardboard can get pretty expensive, so if you can find a local supplier you'll probably save quite a bit. Check the Yellow Pages under Cardboard, Boxes, or Shipping Supplies.


The tools you'll need to build your own storage boxes are shown in figures 28 and 29. You'll need a box-cutter, a square or some other straightedge, a tape measure, a medium size Phillips screwdriver, packing tape, glue, a pencil and a set of four (or better yet, eight) clamps. You can substitute clothespins or the like for the clamps in a pinch (ha!).
 First you'll need to cut the cardboard to size. Cut one piece to 31" x 24 1/4"and the other to 30 1/2" x 23 3/4". The first one will become the lid, the second the base. Mark the cardboard using your tape measure, then place your square and cut along it (figure 30). If you're the forgetful type, like me, mark the pieces to indicate which is the base and the lid. You'll need to keep that straight while building the box.
Now that you've got the cardboard cut to the correct dimensions, you're going to form the vertical sides of the box.
 On the piece that is to become the lid, make marks 1 1/2" in from the edge along all four edges. On the base, do the same, but make your marks 2" in from the edges (figure 31).

Now put your square or straightedge along each of these lines you made and run the Phillips screwdriver along the lines (figure 32). You'll want to press firmly when doing this. You are trying to put a deep score in the cardboard. The Phillips screwdriver will make a rather wide and messy looking score line, but we found that this method works best - a thin score doesn't fold up nearly as well. Figure 33 shows what the scores should look like.

Once you've got all eight scores completed (four on each piece, that is), the next step is to use your box-cutter to cut tabs at each of the corners. Figure 34 shows the cutting of a tab. Make only one cut at each corner. You don't want to cut off those little squares, just free one side of them. Figure 35 shows what you're trying to do. Now this is really important. Cut the scores in one direction on the base, the other direction on the lid. In other words, if you cut along the long edge on the base, cut along the short edge on the lid. If you make the same cuts on both pieces the lid won't fit well on the box.

Once your cuts are made, fold the tabs up as shown in figure 35. Then fold up the entire length of the scores along all the score lines as shown in figure 36. Work the fold back and forth a bit so that it's relatively happy about staying in a vertical position. If you don't make these creases so that they stay vertical, the final result will not fit together very well.

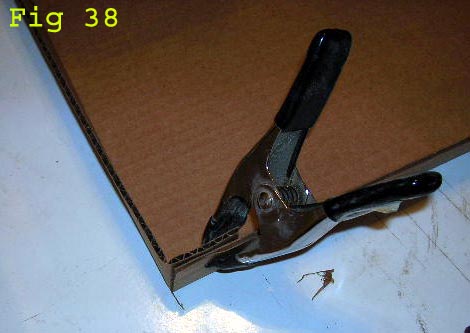

Now take your glue and put a daub on the outside edge of each of the tabs (figure 37). Don't slather on a whole bunch of glue - it's not necessary and will just take longer to dry. After gluing each tab, stick the glued side to the adjacent vertical. Get it nice and square and clamp the two pieces together, as shown in figure 38. You may end up with a little bit of the tab sticking up past the edge of the adjacent vertical. No problem - you can trim that off with the box-cutter after the joint is dry. Figure 39 shows our piece all clamped up. Set each piece aside and wait for the glue to dry - about 10-15 minutes.
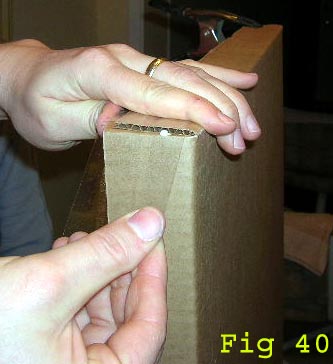
Once the glue is dry take the clamps off. For a little extra strength in the corners, tape each edge on the outside (figure 40). Use wide packing tape so that you can fold some of it inside the box. Not only does this strengthen the box, the smooth surface also makes the lid mate more smoothly with the base.
If you don't plan to bag your Sundays be sure to lay a bag in the bottom of the box. We don't want newspaper touching the cardboard. Figures 41 and 42 show the completed box, ready to start storing your collection.


Reading through these instructions you may think building a box is a pretty big job, but it's a lot easier in practice than it is to explain. The whole process of building a box takes no more than a half-hour or so once you've done a few. My dad was able to build the one you see in the photos in about 45 minutes, and that was with me stopping him constantly to take pictures and write down the steps. And of course the process becomes a lot more streamlined if you build a whole batch of boxes all at the same time, which is the way he normally does it.
Tomorrow we'll finish off this series with a quick tour of my storage area plus a few words about how I keep track of the items in my collection. If you have any suggestions or concerns that you think should be incorporated into this series, now would be a great time to let me know. Also, I'd love to hear about and pass along any hints, tips and techniques you use for storing your collection. Unlike most collecting categories, there are no real tried-and-true, set in stone methods for storing a comic strip tearsheet collection. I'm sure a lot of you have developed your own techniques for dealing with the problems of storing tearsheets.
Tomorrow: Part VII - Storing and Tracking a Large Collection
Comments:
While at the Octoberfest in my area Sunday, Oct. 8th, 2006 I came across a booth of a furniture maker. He was exceptionally good. I saw chests and dressers but I was particularly thrilled to see
a blueprint cabinet. You don't see those any more. They are excellent for storing flat art work
or in your case newspaper pages. I think this man could build what you want in a storage unit but I've always wanted an old blueprint
file. He was also very reasonable and his work was very attractive with a Quaker woodworking quality.
If interested his card info is:
THE WOODCHUCK
Charles Boyd
940-659-3567
charlieboyd@yahoo.com
1529 Teichmann Rd.
Gordon, TX
Trunks, chests, etc.
I couldn't afford his cabinet but I'm keeping his card.
# posted by  : 10/10/2006 12:06 PM
: 10/10/2006 12:06 PM
After many years of reading this I finally took the plunge and decided it was time to make my own boxes. Hope they turn out ok. Now where is the glue......
Post a Comment

![]()